Sunday, January 20, 2013

How to repair a leaking roof Tips

Asphalt shingles are the most popular roofing material for homes today, accounting for nearly 70% of domestic roofing installations, according to Tom Bollnow, senior director of technical services at the National Roofing Contractors Association (NRCA).  And, for good reason—asphalt shingles are lightweight, durable, attractive, and priced well compared to competitive roofing materials.
DolfinDans Flickr Asphalt Shingle Roofing
Photo: Flickr
While most asphalt shingles are manufactured with the latest advancements in weather- and wind-resistance, fire safety, and long-lasting performance, even the best of them can develop problems over time.  The good news is that an asphalt shingle roof is probably the easiest type to repair, since curled shingles can be flattened and re-secured, and old shingles can simply be replaced. Plus, asphalt shingles make the warning signs of a serious roofing problem readily perceptible.

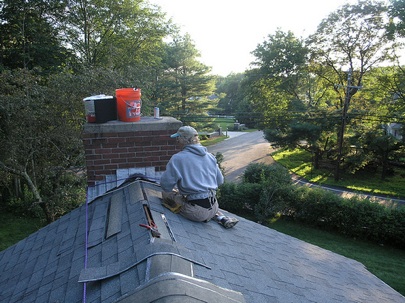
If you discover that your roof is leaking—most likely evident by water stains on the ceiling—note the leak’s location.  Look to see if there are any curled, cracked, or missing shingles.  Leaks can occur at any point where shingles butt, or where caulking and flashing have been compromised.  End caps, the tent-shaped shingles that cover the angular peaks of the roof, can also be the source of leaks, so check those as well.
If you discover shingle problems (which you can do from the ground with a good pair of binoculars), repairs may be an easy fix.  Curled-back shingles, for example, can be re-secured by brushing on a coating of asphalt roofing cement or finding its equivalent compound in tubes for use with a caulk gun.  You’ll want to apply a generous amount of roofing cement to the underside of the shingle to make certain that the edge and corners are secured.  Then press firmly to set.  Note: Shingles will be more pliable in warm weather than when it’s cold, so consider that factor when resolving problems.
How Stuff Works How to Repair a Leaky Asaphalt Shingle Roof
Photo: How Stuff Works
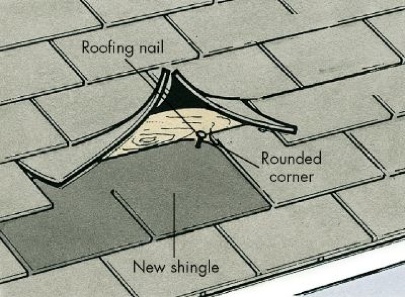
If shingles are cracked, missing or rotten, replacing them may be another simple fix (provided you have the replacement shingles). To remove a damaged shingle, lift the edges of the surrounding shingles and carefully remove nails with a pry bar.  Once the nails are removed, the shingle should slide out.  Scrape away any of the residue cement from the roof and level or remove protruding nails.
Before you attempt to replace a new shingle, round the back corners with a utility knife.  This will make it easier for you to slide the shingle under the one above and align it with those on either side.  Once you have it in position, lift the corners of the overlapping shingles and fasten the top of the new replacement with 6d galvanized roofing nails.  Be sure to secure with nails in each corner.  Last, cover the nail heads with roof cement and smooth down the overlapping shingle edges.
To repair leaks caused by metal flashing around chimneys and dormers, simply reseal joints with a caulk gun of roofing cement.  If you see damage to joints previously sealed with a line of roof cement, apply a fresh new coat with a putty knife.
If you are replacing a row of shingles, or if you find that shingles lift from the roof easily, it may be time to call in a professional roofer to inspect the situation.  Spot repairs will not extend the life of a roof in need of replacement.
For more information on roofing and home maintenance, check out the following Bob Vila articles and videos:

 

Wednesday, January 9, 2013

10 cheap ways to fix up your house yourself.

10 ways to fix up your house to boost its value


Looking for ways to fix up your house without putting yourself in the poorhouse? Whether you're getting ready to sell your home or want to spiff it up inexpensively for your own enjoyment, we've got 10 good strategies for you to consider.
The actual cost and payback for each project can vary, depending on both your home's condition and overall real estate market values in your region of the country.
Boost your home's value
These simple upgrades can easily add thousands of dollars to your home's value.
 
10 cheap fix up your house methods
  1. Make your kitchen really cook.
  2. Give appliances a facelift.
  3. Buff up the bath.
  4. Step up your storage.
  5. Add a room in a week or less.
  6. Mind the mechanics.
  7. Look underfoot.
  8. Let there be light.
  9. Reframe your entry.
  10. Consider curb appeal.

1. Make your kitchen really cook. The kitchen is still considered the heart of the home. Potential home buyers make a beeline for this room when they first view a home for sale, so make sure your kitchen looks clean and reasonably updated.
For a few hundred dollars, you can replace the kitchen faucet set, add new cabinet door handles and update old lighting fixtures with brighter, more energy-efficient ones.


.
If you've got a slightly larger budget, you can give the cabinets themselves a makeover. "Rather than spring for a whole new cabinet system, which can be expensive, look into hiring a refacing company," says serial remodeler Gwen Moran, co-author of "Build Your Own Home on a Shoestring."
"Many companies can remove cabinet doors and drawers, refinish the cabinet boxes, then add brand-new doors and drawers. With a fresh coat of paint over the whole set, your cabinets will look like new."
If you're handy, you can order your own replacement cabinet doors and door fronts from retailers like Lowe's Home Improvement or The Home Depot and install them yourself.


2. Give appliances a facelift. If your kitchen appliances don't match, order new doors or face panels for them. When Nicole Persley, a Realtor in Boca Raton, Fla., was sprucing up her own home to sell, her mix-and-match kitchen bothered her. The room had a white dishwasher, microwave and wall oven mixed with other pieces that were stainless steel with black trim.
When Persley called the dishwasher manufacturer to see about ordering a new, black face panel, the customer service representative clued her in on a big secret: Many dishwasher panels are white on one side and black on the other.
"All I had to do was unscrew two screws, slide out the panel and flip it around. Sure enough -- it was black on the other side!"
Persley, who has remodeled numerous homes for resale, says that a more cohesive-looking kitchen makes a big difference in the buyer's mind -- and in the home's resale price.

3. Buff up the bath. Next to the kitchen, bathrooms are often the most important rooms to update. They, too, can be improved without a lot of cash. "Even simple things like a new toilet seat and a pedestal sink are pretty easy for homeowners to install, and they make a big difference in the look of the bath," says Moran.
advertisement
Moran also suggests replacing an old, discolored bathroom floor with easy-to-apply vinyl tiles or a small piece of sheet vinyl. "You may not even need to take up the old floor. You can install the new floor right over the old one," she says.
If your tub and shower are looking dingy, consider re-grouting the tile and replacing any chipped tiles. A more complete cover-up is a prefabricated tub and shower surround. These one-piece units may require professional installation but can still be cheaper than paying to re-tile walls and refinish a worn tub.


4. Step up your storage. Old houses, particularly, are notorious for their lack of closet space. If you have cramped storage areas, Realtor Moe Viessi of Miami suggests adding do-it-yourself wire and laminate closet systems to bedrooms, pantries and entry closets.
Firms like ClosetMaid allow you to measure and redesign your closets online. You can also get design details and parts for these systems at many large home-improvement stores. Most closets can be updated in a weekend or less.
In the end, your closets will be more functional while you're living in the house and will make your home look more customized to potential buyers when you're ready to sell.


5. Add a room in a week or less. "If you have a three-bedroom house with a den, the only reason the den can't be considered a bedroom may be because it doesn't have a closet," says Persley. "If you add a closet to that room, you've now got a four-bedroom house. That adds a lot of value."
Persley says it's usually possible to add a custom closet system and drywall it in for less than $1,500.
6. Mind the mechanics. Finley Perry of F.H. Perry Builder in Hopkinton, Mass., advocates spending a few bucks on nitty-gritty stuff. "It's often very worthwhile to hire an electrician and plumber for a couple of hours to look over your electrical services, wrap or fix loose wires, fix any faulty outlets, and check for and fix any water leaks," Perry says. "Those details tell a buyer that someone has really taken care of the home and can really influence its price."

7. Look underfoot. Carpeting is another detail that can quickly update a home and make it look cleaner. A professional carpet cleaning is an inexpensive investment, especially if your rugs are in good shape and are neutral colors.
If your carpet is showing serious wear, cover it with inexpensive, strategically placed area rugs. Unless it is truly hideous, most real estate agents don't suggest replacing wall-to-wall carpeting right before you sell your house. The new homeowners may want to choose their own carpeting after they move in.
8. Let there be light. If you have boring recessed lights in your dining and living rooms, consider replacing one of the room's lights with an eye-catching chandelier. Home stores offer a wide range of inexpensive, but nice-looking, ceiling fixtures these days. If you have a ceiling fan and light, you can also buy replacement fan blades (leaving the fan body in place) to update the fixture's look.


9. Reframe your entry. Do you have a flimsy little knob on your main entry door? If so, spring for a substantial-looking handle-and-lock set. "A nice, big piece of hardware on the front door signals to newcomers that this is a solid home," says Viessi.
Also, if you're stuck with a basic steel front door, Persley suggests painting or faux-finishing it for more eye appeal. "It's becoming a trend in Florida to add wood-grain doors to a home's entry or garage. The good news, though, is that you can easily paint existing metal doors with stain and paint," she says.
After using a good metal primer, Persley gives the door a base coat of paint (again, be sure to use one approved for use over metal). For a cherry wood look, Persley uses a burgundy base paint. After it dries, she brushes over the base coat with a cherry wood stain. "It really looks amazing, and it only takes a few hours," she says.


10. Consider curb appeal. Although it sounds obvious, a nicely mowed lawn, a few well-placed shrubs and a swept walkway makes a great first impression. "What buyers see when they first drive by your home is tremendously important," says Viessi.
If you don't have a green thumb, consider hiring a landscaper to install some new sod, plant a few evergreen shrubs and give your front yard a good cleanup. "These kinds of changes can instantly change people's perception of your home and, therefore, increase its value," says Viessi. And hey, your neighbors will love you for it, too.

Monday, January 7, 2013

How to: Naturally Unclog the Bathroom Sink

 How to: Naturally Unclog the Bathroom Sink
 atla030308-clogged.jpg

Got a clogged or slow draining bathroom sink? You'd be horrified to see what's down there: grease, hair, soap film, organic wastes and whatever else you wash down the sink. Here's a natural formula to unclog that bathroom sink without harsh chemicals... Pour 1/2 cup of baking soda down the drain, followed by 1/2 cup of white vinegar. This will create an acidic reaction much like your elementary school volcano science project, eating away at whatever is down in the pipes. Then followup with a cup of lemon juice or diluted lemon juice extract to help neutralize any odors that might emanate from your drain cleaning. That's it! We also like to use the baking soda and white vinegar solution on the sink itself, as this simple formula is an effective limescale and scuff marks remover when used with a sponge.

Saturday, January 5, 2013

How to fix a hole in drywall

 How to fix a hole in drywall


How to Patch a Hole in Drywall -- powered by ehow

Oops, you knocked a hole in the wall. Don't worry, it's not hard to fix. Small holes in drywall (such as nail holes) can be filled with white toothpaste or spackling paste. For something a bit larger, read on.


Instructions on how to fix a Hole in drywall


Things You'll Need


  • Paints
  • Drywall Nails
  • Drywall
  • Stud Finders
  • Primers
  • Drywall Joint Tape
  • White Toothpaste
  • Brushes
  • Drywall Trowel
  • Utility Knives
  • Putty Knives
  • Wet And Dry Sandpaper
  • Wallboard Tape
  • Sheetrock
  • Spackle
  1. Patching Smaller Holes

    • 1
      Strip away any raised portions of the drywall paper around the edge of the hole.
    • 2
      Sandpaper all around the edges of the hole enough to scrape and roughen the paint.
    • 3

      For holes roughly 1 to 3 inches wide, apply self-adhesive plastic mesh tape. (Skip this step for smaller holes.)
    • 4

      Use a putty knife to apply spackling compound or a hard-setting, fast-drying patching compound. Smooth it out.
    • 5

      Repeat step 4 after the spackling shrinks, if necessary.
    • 6
      Allow the spackling to dry. Sand the area smooth, prime it and paint.

    Patching Larger Holes

    • 7
      Find the stud that is closest to the hole and use a drywall knife or saw to cut out a rectangle of drywall around the hole, including half of the width of the stud.
    • 8
      Roughen up the paint several inches all around the cut with sandpaper.
    • 9
      Cut a new piece of drywall the same size as the one you removed. Use the cutout as a patch.
    • 10
      Attach your new drywall patch to the stud using drywall screws or dry-wall nails, being careful to set the heads just below the surface, but not too deep - you don't want to break the paper.
    • 11
      Using a wide putty knife, apply a thin spread of joint compound along the seams. Gently press paper joint tape into the joint compound with your putty knife. Be sure that the edges of the tape are embedded in the compound, but scrape any excess compound from the tape.
    • 12
      After the joint compound is dry, spread two or three additional thin coats of compound over the tape, extending 4 to 8 inches on each side of the seam to blend in with the surrounding wall. Sand lightly between coats.
    • 13

      Paint primer over the new patch. If the seams are still visible after it dries, apply more joint compound before final painting.

Friday, January 4, 2013

How to fix a sagging gate with a gate repair kit

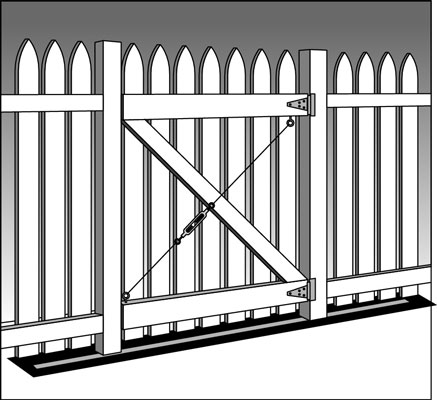
A sagging wooden gate is a nuisance at best, and can, at some point, become impossible to open. The problem must be pretty common, because someone has already packaged and marketed a repair kit for exactly that purpose. It’s called a gate repair kit or turnbuckle kit, and it consists of a cable with corner mounting brackets and a turnbuckle. The nice thing about a turnbuckle kit is that it can be tightened or loosened to raise or lower the gate.
The kit contains:
  • Two metal corner brackets with mounting nails
  • Two lengths of wire cable with galvanized metal U-bolts, which are used to attach one end of each cable to one of the corner brackets and then the other end of each cable to the turnbuckle
  • A galvanized metal turnbuckle
Here’s how it works:
  1. Attach a metal bracket to the upper corner of the gate (on the hinge side).
  2. Mount another bracket diagonally at the lower corner of the gate on the latch side.
  3. Attach cables to each corner bracket and then to the two ends of a turnbuckle.
    image0.jpg
    As you tighten the turnbuckle, the latch side of the gate rises. As you loosen the turnbuckle, the latch side of the gate drops.
This system won’t work if the upper bracket isn’t placed on the hinge side of the gate.

original post in  http://www.dummies.com

Thursday, January 3, 2013

How to fix a unlevel table

Leg Leveler

Most shop floors are uneven. So whenever I build a shop-made tool stand, I allow for some handy leg levelers. (They add about 2" to the height of the stand.)
The thing that’s unusual about this leveler is the rubber tip on the bottom. This keeps the stand from “walking” across the shop floor shop if there’s any vibration produced by the tool.

The rubber tip is nothing more than the pad from the bottom end of a crutch. (I picked them up at a local hardware store for about 75 cents apiece.) The crutch tip fits over a dowel that has a hole drilled in it to accept a carriage bolt, as you can see in the drawing at right.

After slipping on a washer and hex nut, the bolt threads into a T-nut installed in the bottom of the leg. Note: To provide clearance for the bolt as you adjust the leveler, you’ll need to drill a deep shank hole for the T-nut, as shown in the Cross Section drawing at right.


The only thing to keep in mind when using the leveler is the nut has to be tight. This keeps the dowel from spinning as you adjust the leveler.                                                                                  


Leg Leveler

Leg Leveler

Wednesday, January 2, 2013

How to Fix a Sagging Door

Deck Screws Fix Sagging Doors  
A heavy door can sag after it's been hanging for a while. Its weight can also cause the door jamb to twist. But before you consider trimming the door to make it fit, give this trick a try.
The problem in most cases is that the fasteners holding the door in place can't support the door's weight. The jamb is typically held in place with a few 6d finish nails, and the screws holding the door hinge to the jamb are fairly short. To support a heavy door, you've got to use long screws so you can connect with the wall framing.
The drawings show what I do to fix a sagging door. First remove two of the three short screws in the hinge and replace them with 2" deck screws. These longer screws will reach into the stud and help secure the door. If the door is really heavy, I'll even remove the door stop and drive 2" deck screws through the door jamb above and below the hinge plate. This helps keep the jamb from twisting as the casing and framing swell and shrink. The stop will hide the screw heads after it’s reattached.